Windows Startup: how to find out which programs start automatically?
A slow-starting computer is one of the most common problems faced by Windows users. Often, the cause is not a lack of hardware performance, but the large number of applications that launch automatically with the operating system (Windows Startup). These programs consume resources from the very first seconds after startup and can turn a fast PC into a slow and frustrating one.
Fortunately, Windows provides built-in tools that allow you to check and manage the applications that run automatically at startup. By disabling those that are not essential, you can reduce startup time and improve the overall performance of the system.
Why does Windows start slower over time?
As you install new programs, many of them automatically configure to launch at system startup. Messaging applications, cloud services, printer software, gaming platforms, or various utilities can run in the background without the user being aware of it.
Each application added to startup consumes RAM, processor, and storage resources. Over time, the cumulative effect can become significant, especially on older systems or laptops with limited resources.
System administration experts recommend periodically checking the list of programs that start automatically and keeping only the applications that are truly necessary active.
How to check which programs start automatically in Windows
The quickest method is to use Task Manager, a tool included in all modern versions of Windows.
Steps to follow:
- Press the Ctrl + Shift + Esc key combination to open Task Manager.
- If the simplified version appears, select “More details”.
- Go to the Startup Apps tab.
- Review the list of displayed programs.
- To disable an application, select it and press Disable.
An important advantage of this section is that Windows also displays the impact of each application on the startup process. Programs are classified as low, medium, or high impact, which helps you quickly identify the elements that slow down the system the most.
What types of Windows Startup applications can you safely disable?
In general, many applications do not need to run immediately after the computer starts. Common examples include:
- Communication applications that you do not use constantly;
- Gaming platforms;
- Programs for automatic updates;
- Secondary cloud services;
- Utilities installed by the laptop manufacturer.
However, it is recommended to be cautious with applications related to security, hardware drivers, or essential system components. If you are unsure what a program does, research it before disabling it.
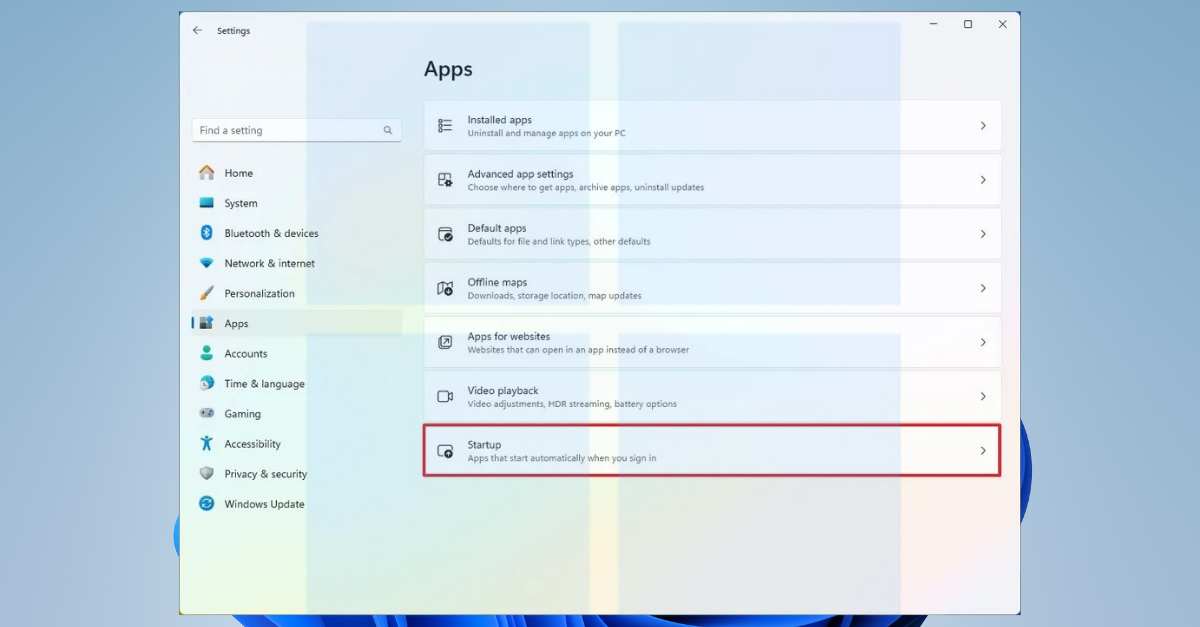
Managing Windows Startup from Settings
Windows 10 and Windows 11 allow management of startup applications from the Settings menu as well.
To get there:
Settings → Apps → Startup
In this section, you will find the same list of applications, along with the ability to quickly enable or disable their automatic launch. Microsoft recommends this method as the official solution for customizing the system’s startup process.
The benefits of optimizing Windows Startup applications
Smart management of programs that start automatically offers several advantages:
- Shorter startup time;
- Reduced RAM consumption;
- More efficient use of the processor;
- Faster system response after login;
- Better battery life on laptops running on battery.
In many cases, users notice an immediate difference after removing unnecessary applications from startup, without the need to purchase a new computer or costly hardware upgrades.
With the help of Task Manager or the settings menu, you can quickly identify applications that consume unnecessary resources and disable them in just a few seconds. This simple operation can significantly contribute to improving the overall performance of the system and provide a smoother user experience.
Source: support.microsoft.com